There may be instances when you want to invite a user to establish a data connection to an ERP, CRM, operational system or other data source but that user only needs one-time access to setup the connection--the user does not need access to the BUCS platform for any other purpose. In these instances, you can send a one-time temporary access link to establish the data connection.
This article will show you how to:
- Invite a Guest User to Establish a Data Connection
- Establish the Connection as a Guest User
- View Pending Invites and Resend a One-Time Connection Link
- Confirm Data from the Guest User has Been Integrated
Invite a Guest User to Establish a Data Connection
- Navigate to BUCS Customer Portal > Connection Management > Connection Hub.

- Locate or search for the data connection you want to establish.
⚠️Only data connections with the email icon allow you to send guest users a one-time access link to establish the connection. - Click Connect.

- Provide a descriptive name for the connection such as the company you are inviting and the data connection system. Click Send One-Time Invite.

- Provide the guest user's name, email address and company name. Click Send Invitation.

Establish the Connection as a Guest User
- After the one-time invitation is sent, the guest user will receive the following email with a link to click to establish the connection. The name of the user who invited the guest and their company will be provided in the email to give the user context.

⚠️For security purposes the link will expire after 72 hours and the connection can only be set up once. The link will not work to setup multiple connections. If a user needs to setup multiple connections, you will need to send a one-time invite for each data connection. - Once the user clicks the Set Up link, they will be asked to authenticate to the data connection system and click Sign In. Then they will choose to connect the data system to BUCS Analytics.

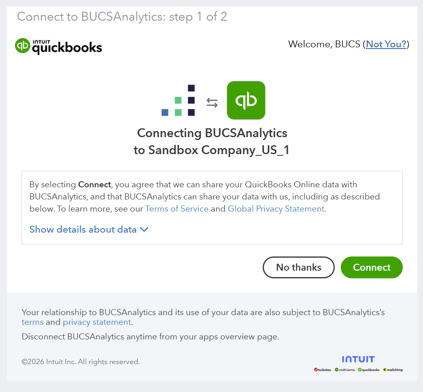
- If the connection was established successfully the guest user will see a Connection Established message and data will continuously sync to BUCS. If the connection was not successful, the user will be asked to try again.

View Pending Invites and Resend a One-Time Connection Link
If an invitation link expires, or a guest user cannot locate the initial email that was sent, you can resend the guest user an invite.
- Navigate to BUCS Customer Portal > Connection Management > Pending Invites.

- Review the invitations you have sent and when the one-time link is set to expire.
- Locate the invitation you would like to resend, and click the Resend icon.

ℹ️ If the one-time link had not expired and you resend the invitation, the original link will expire and the guest user has to take action from the most recent invitation.
Confirm Data Connection Has Been Established
- Once the guest user establishes the connection you will receive an email with the connection details.

- You can also navigate to BUCS Customer Portal > Connection Management > My Connections to review the connection status and last sync date.
